
EFFORTLESS INSTALLATION, ENHANCED POWER
Upgraded with powerful features like parking mode and low-voltage protection, the Dongar PRO offers the same easy installation as our classic adapter.
The Dongar Pro is the first and only parking-mode-enabled plug & play adapter on the market.
It utilizes your auto-dimming rearview mirror as a power source for an easy, invisible, and truly plug-and-play dash cam setup—no messy hanging wires and no complicated fusebox installation.
Equipped with three versatile power modes – ignition, timed, and continuous – it allows you to safely power your dash cam, even when parked.
What's Included?
-
A - PRO USB MODULE
The PRO Module will connect to your vehicle's power source on one end, and your dash cam on the other.
-
B - SHORT USB CABLES
Used to connect your dash cam to your PRO module. Includes USB-C, Micro USB, and Mini USB.
-
C - SMALL PRY TOOL
Included tool to assist with installation in vehicles with a shrouded mirror.
-
D - 10-PIN TYPE A WIRING HARNESS
Connects your vehicle to the Dongar PRO. The 10-Pin Type A Wiring Harness is used in Mazda vehicles with non-shrouded mirrors.
-
D - 10-PIN TYPE E WIRING HARNESS
Connects your vehicle to the Dongar PRO. The 10-Pin Type E Wiring Harness is used in Mazda vehicles with shrouded mirrors.
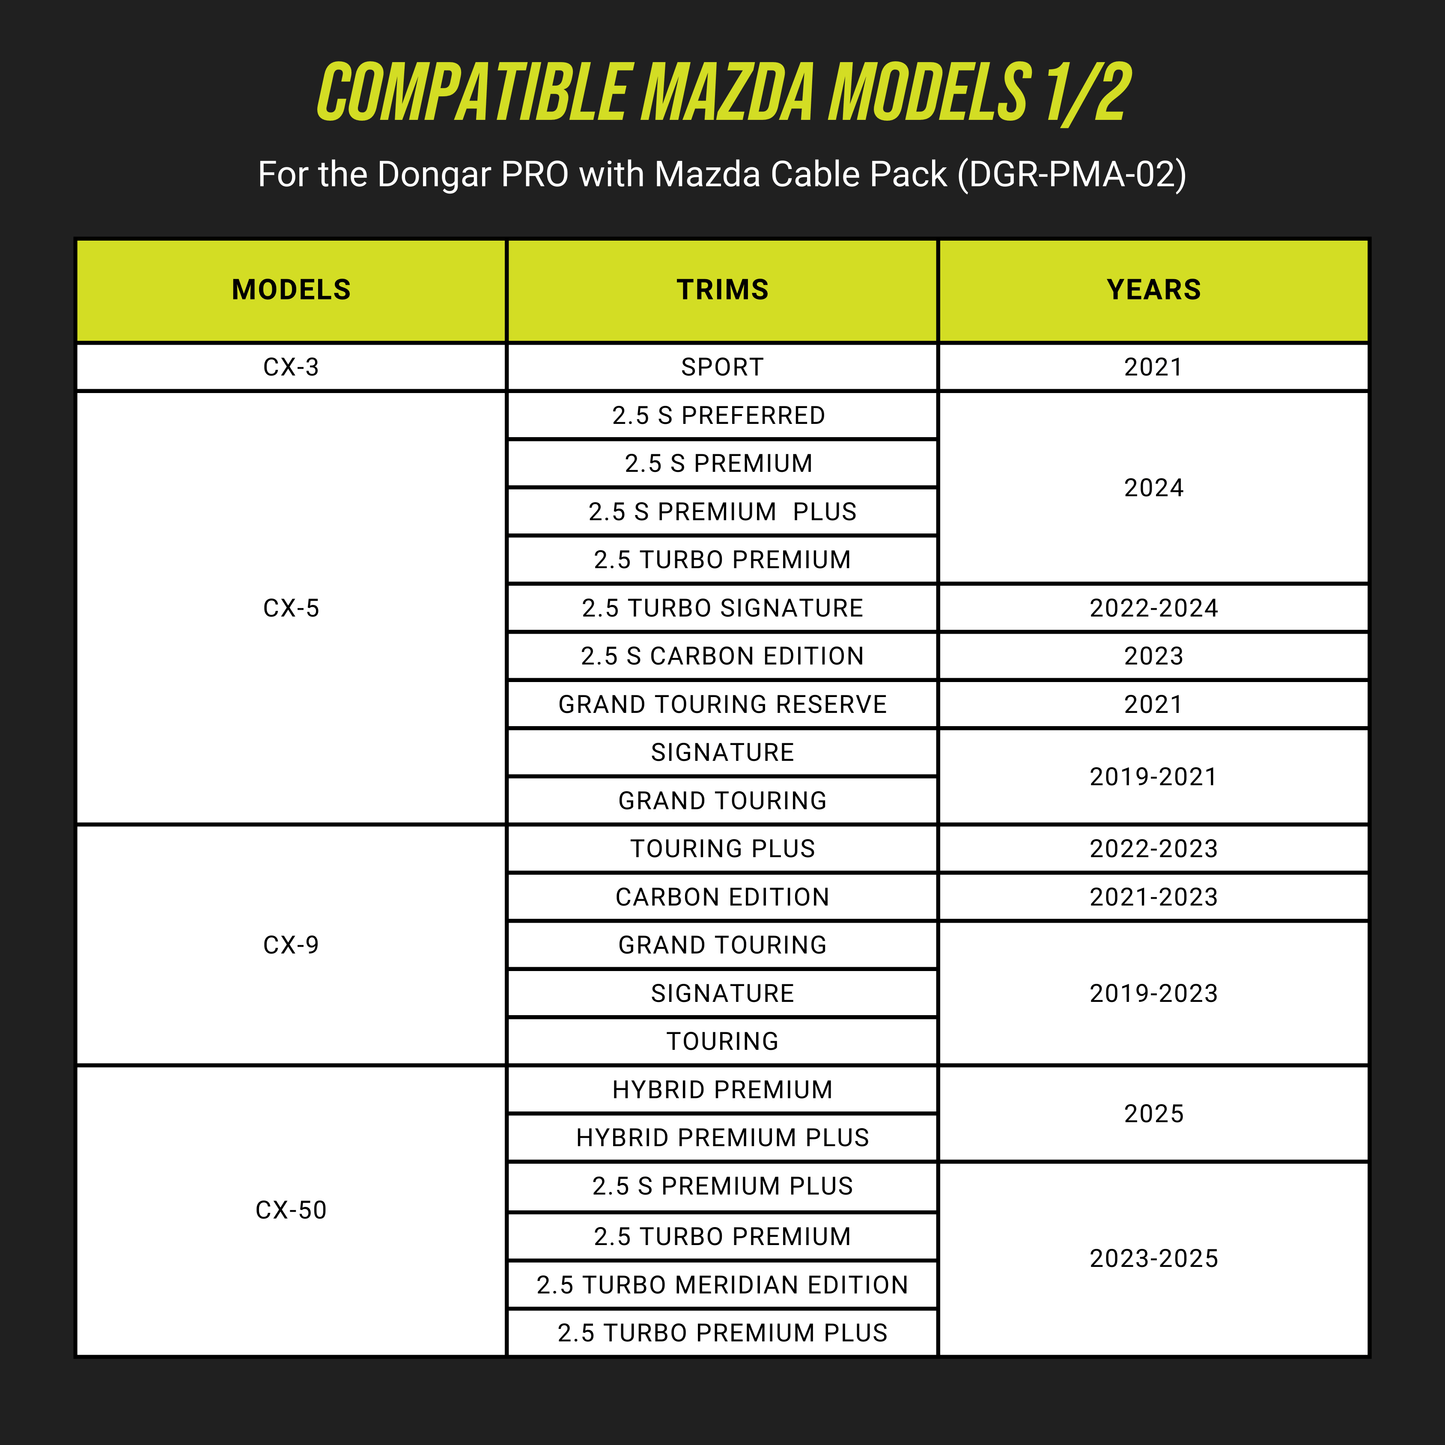
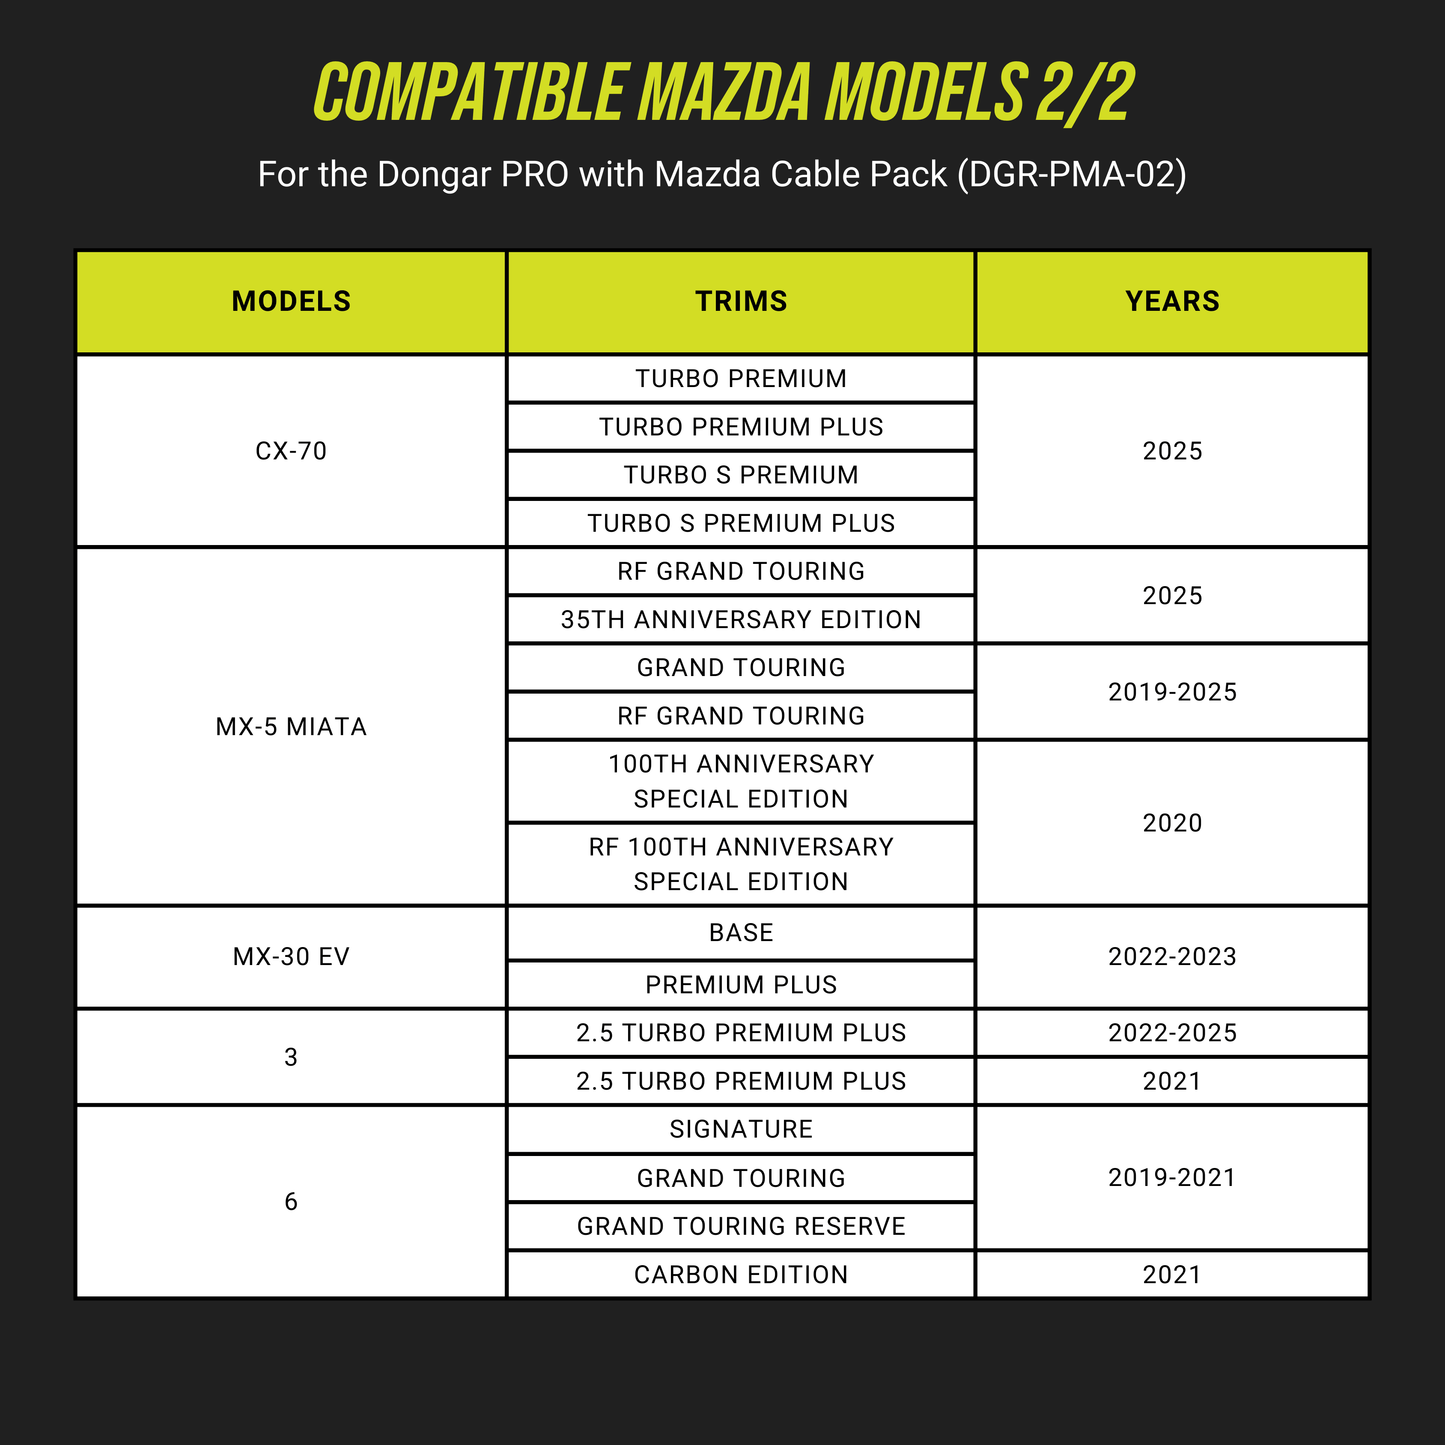
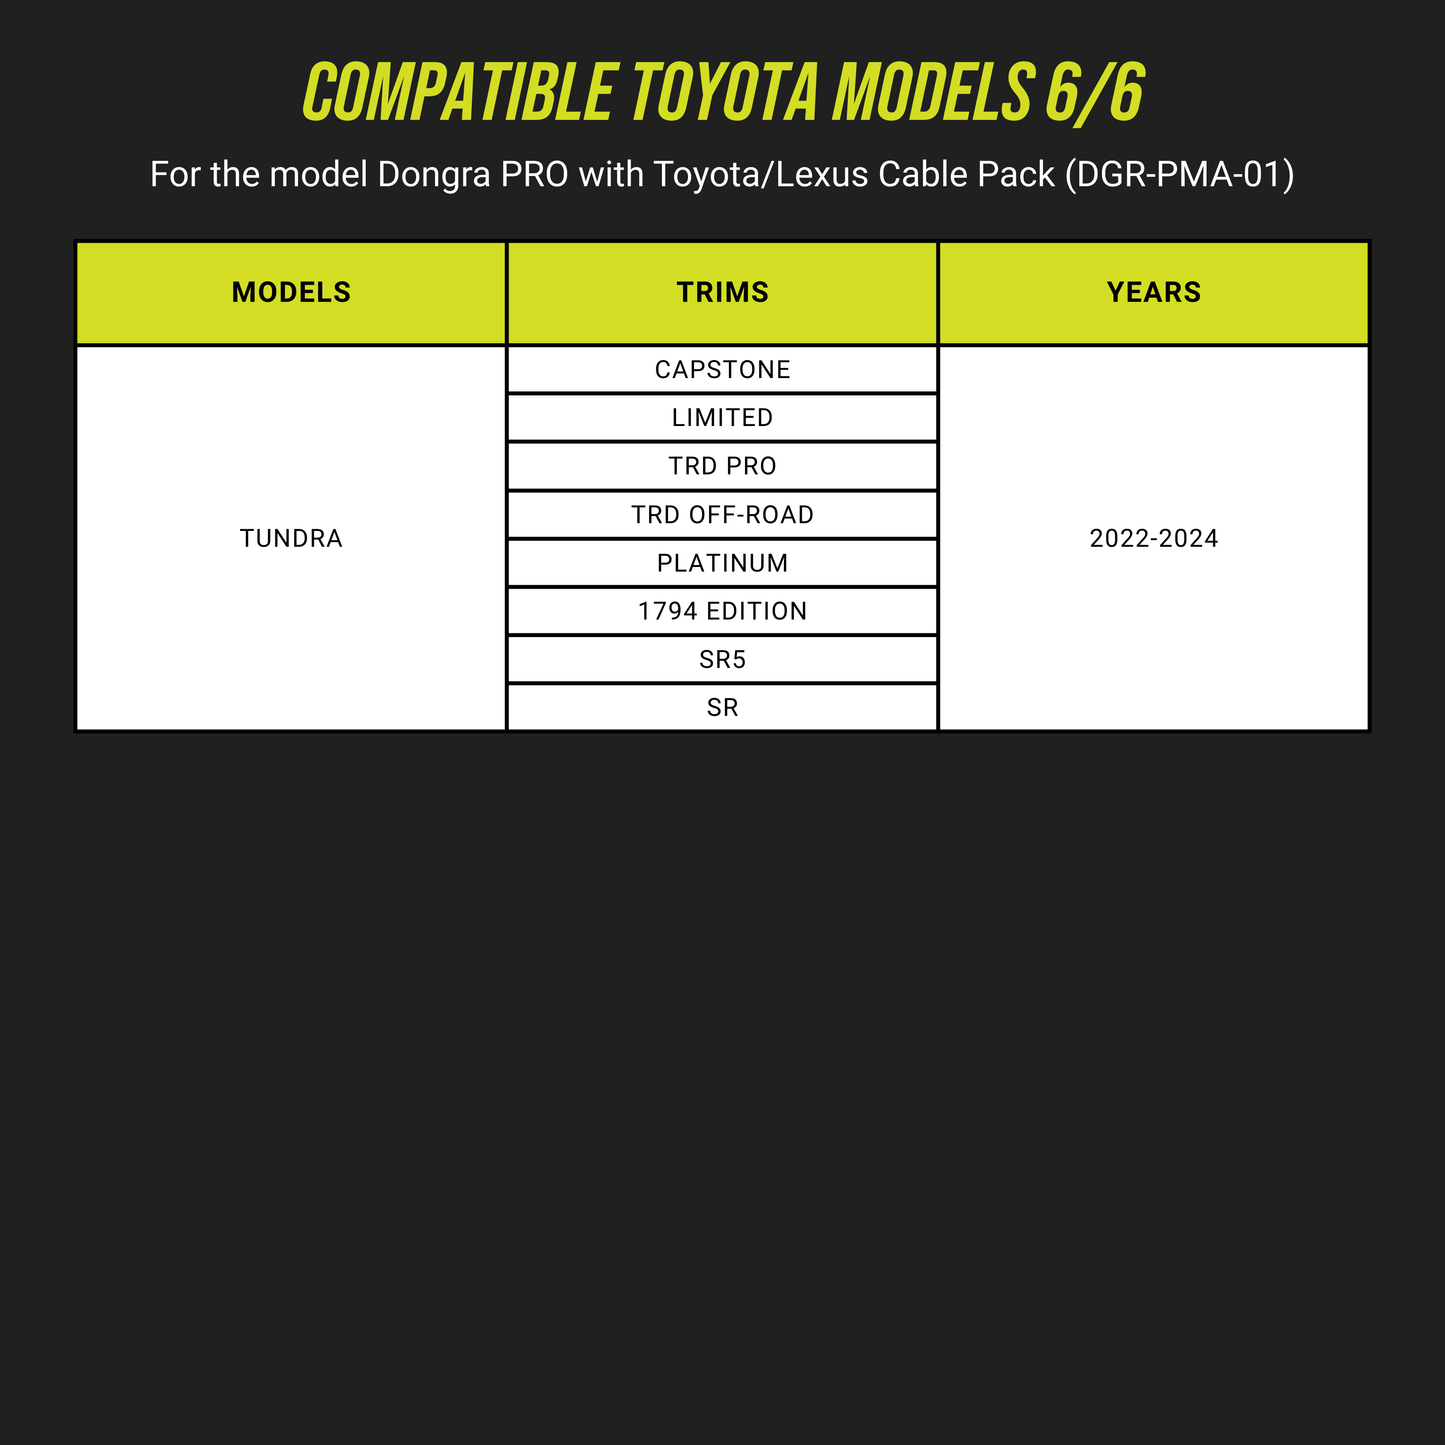
COMPATIBILITY:

HOW TO INSTALL
The Dongar PRO is installed through your rearview mirror. Generally, your installation as well as your wiring harness will change depending on if your rearview mirror is shrouded or not. (Shrouded rearview mirrors will use the 10-Pin Type E wiring harness, and non-shrouded mirrors will use the 10-Pin Type A harness).
Sometimes (for example, in some of the CX Series), you may have an exposed port as well as a shrouded mirror covering another port. In this case we recommend the 10-Pin Type A (following the non-shrouded rearview mirror instructions) for an easier and faster installation – however, you can choose to install the 10-Pin Type E (under the shroud) for a more OEM looking result.
Not sure if your rearview mirror is shrouded or not? Click here to learn more.
Shrouded Mirror Install:
- Turn your vehicle [OFF] and tilt your rearview mirror down for easier access to the shroud.
- You will need to remove the left side of the shroud. To do so, first pull down at the front of the seam running through the center of the full shroud. Then, gently run the pry tool (Item C) down the length of the seam to disconnect the front clips and all connection points.
- With the left side of the shroud removed, locate the connector port at the bottom of the shroud behind the rearview mirror and disconnect the vehicle’s 10-Pin connector by depressing the locking tab and pulling the connector straight out.
- Insert the 10-Pin male end of the wiring harness (Item D) into the vehicle’s connector port and plug the vehicle’s original connector into the female end of the 10-pin wiring harness (Item D).
- Connect your 10-Pin Type E harness (Item D) to the PRO Module (Item A) by inserting the small 3-pin end into the PRO Module (Item A).
- Turn your vehicle [ON] and ensure that the Dongar PRO is receiving power. Once you have confirmed power is running to the PRO, route the wiring accordingly and reassemble the plastic shroud with a clear view out of the windshield.
- Remove the 3M backing on the PRO module (Item A) and find a nice, clean spot on the windshield to attach it.
- Select the appropriate USB-C power cable (Item B) for your dash cam. Plug one end into the PRO Module (Item A) and the other end into your dash cam.
- Mount your dash cam in a spot with a clear view out of the windshield.
Non-shrouded Mirror Install:
- Turn your vehicle [OFF] and tilt your rearview mirror down for easier access to the back of the rearview mirror.
- Locate and unclip the mirror's connector (at the back of the mirror). Then, plug the matching male ends of the wiring harness (Item D) into the mirror's female port.
- Plug the male end of the original mirror connector into the female end of the harness (Item D). Plug the smaller 3-pin head of the wiring harness into the PRO USB module (Item A).
- Select the appropriate USB-C power cable (Item B) for your dash cam. Plug one end into the PRO Module (Item A) and the other end into your dash cam.
- Turn your vehicle [ON] and ensure the dash cam is receiving power. Once you have confirmed the dash cam is receiving power, mount the dash cam and PRO adapter on a clean spot on the windshield.

Dongar