MORE CHOICES, MORE POWER.
With features like multiple power modes and low-voltage protection, the Dongar PRO Hardwire Kit gives you seamless, flexible power options for any vehicle.
Power your dash cam how you want, when you want.
WITH JUST THE FLICK OF A SWITCH, YOU CAN CHOOSE FROM THREE VERSATILE POWER MODES – IGNITION, TIMED, OR CONTINUOUS – TO SAFELY POWER YOUR DASH CAM.
WHAT'S INCLUDED:
-

A - PRO USB MODULE
The PRO Module will connect to your vehicle's power source on one end, and your dash cam on the other.
-

B - HARDWIRING CABLE (1)
Composed of 3 wires – red [constant power], yellow [ignition-on power], and black [grounding wire].
-

C - SMALL PRY TOOL
Included tool to assist with installation.
-

D - SHORT USB CABLES
Used to connect your dash cam to your PRO module. Includes USB-C, Micro USB, and Mini USB.
-

E - FUSE TAPS W/ PRE-INSTALLED FUSES (8)
Includes ATO (Regular) Fuse [x2], Micro2 Fuse [x2], Mini Fuse [x2], and Low-Profile Mini Fuse [x2].
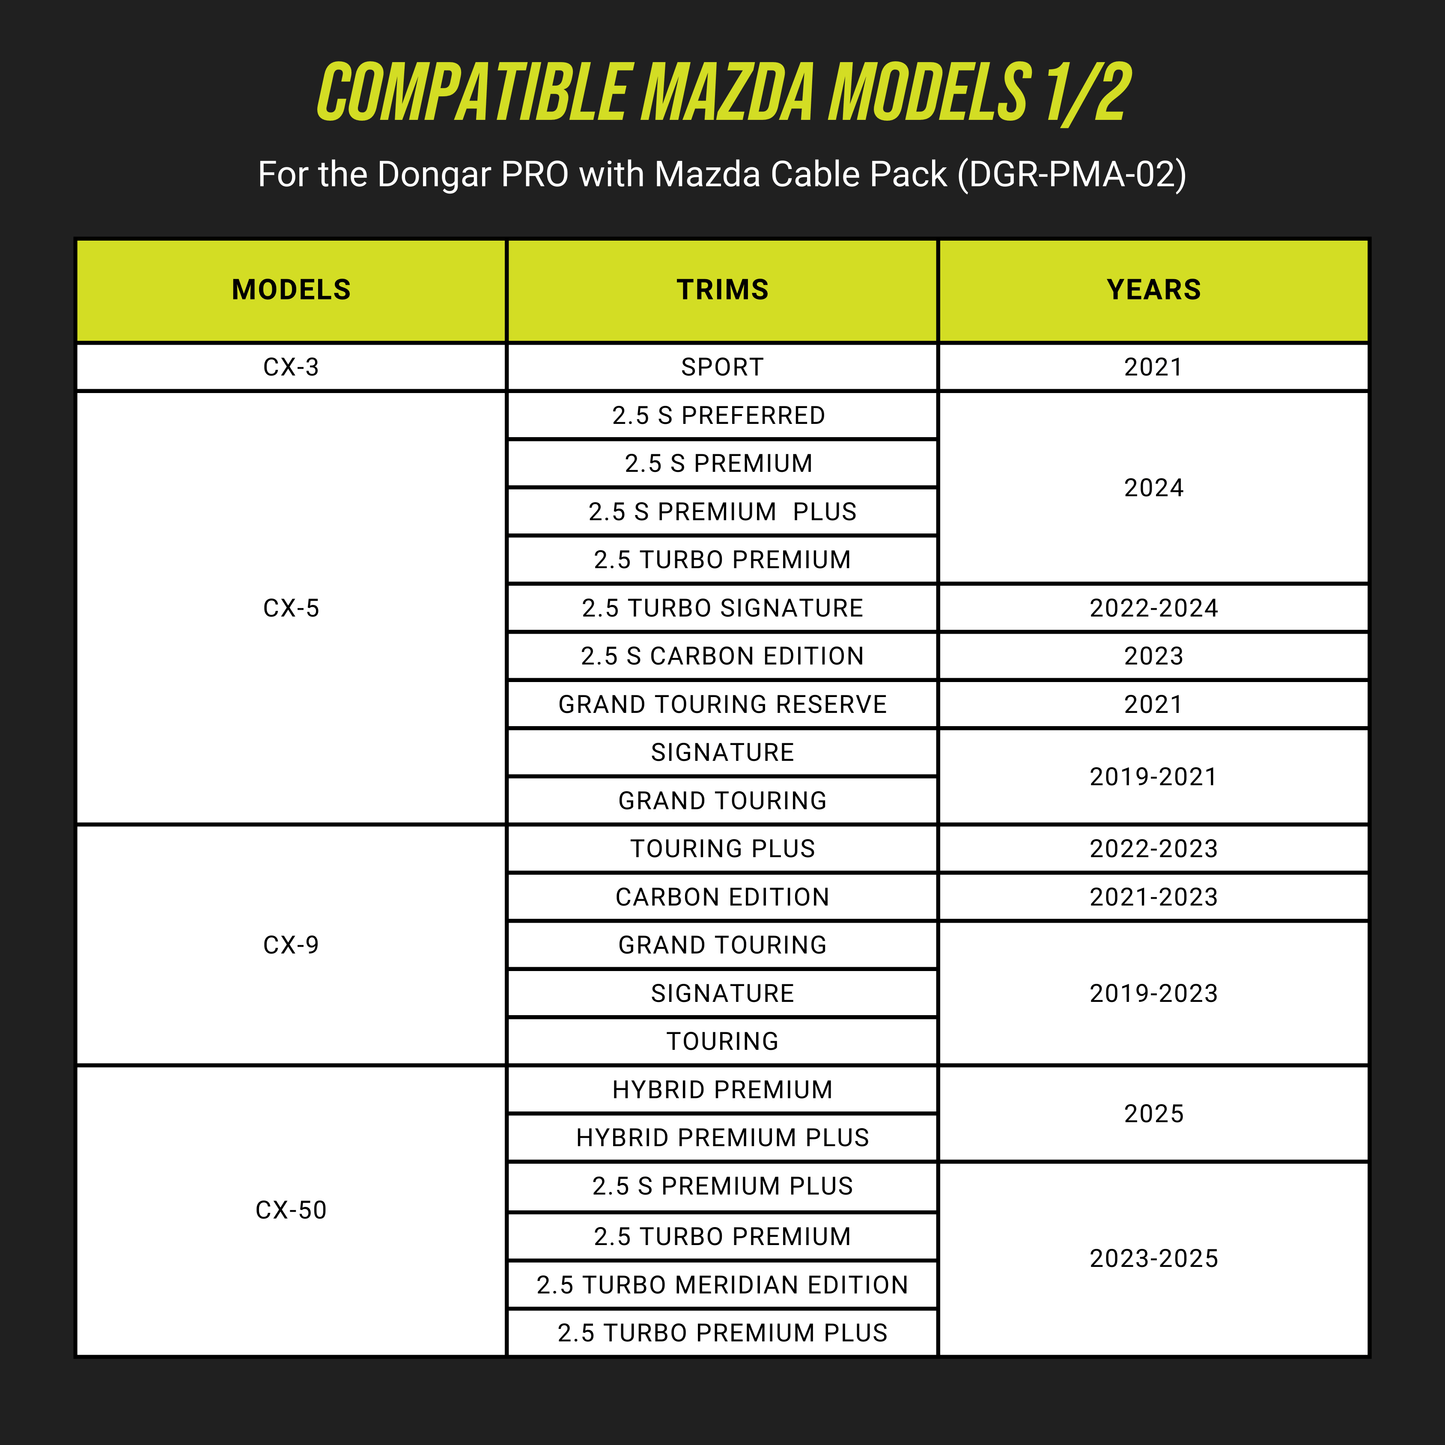
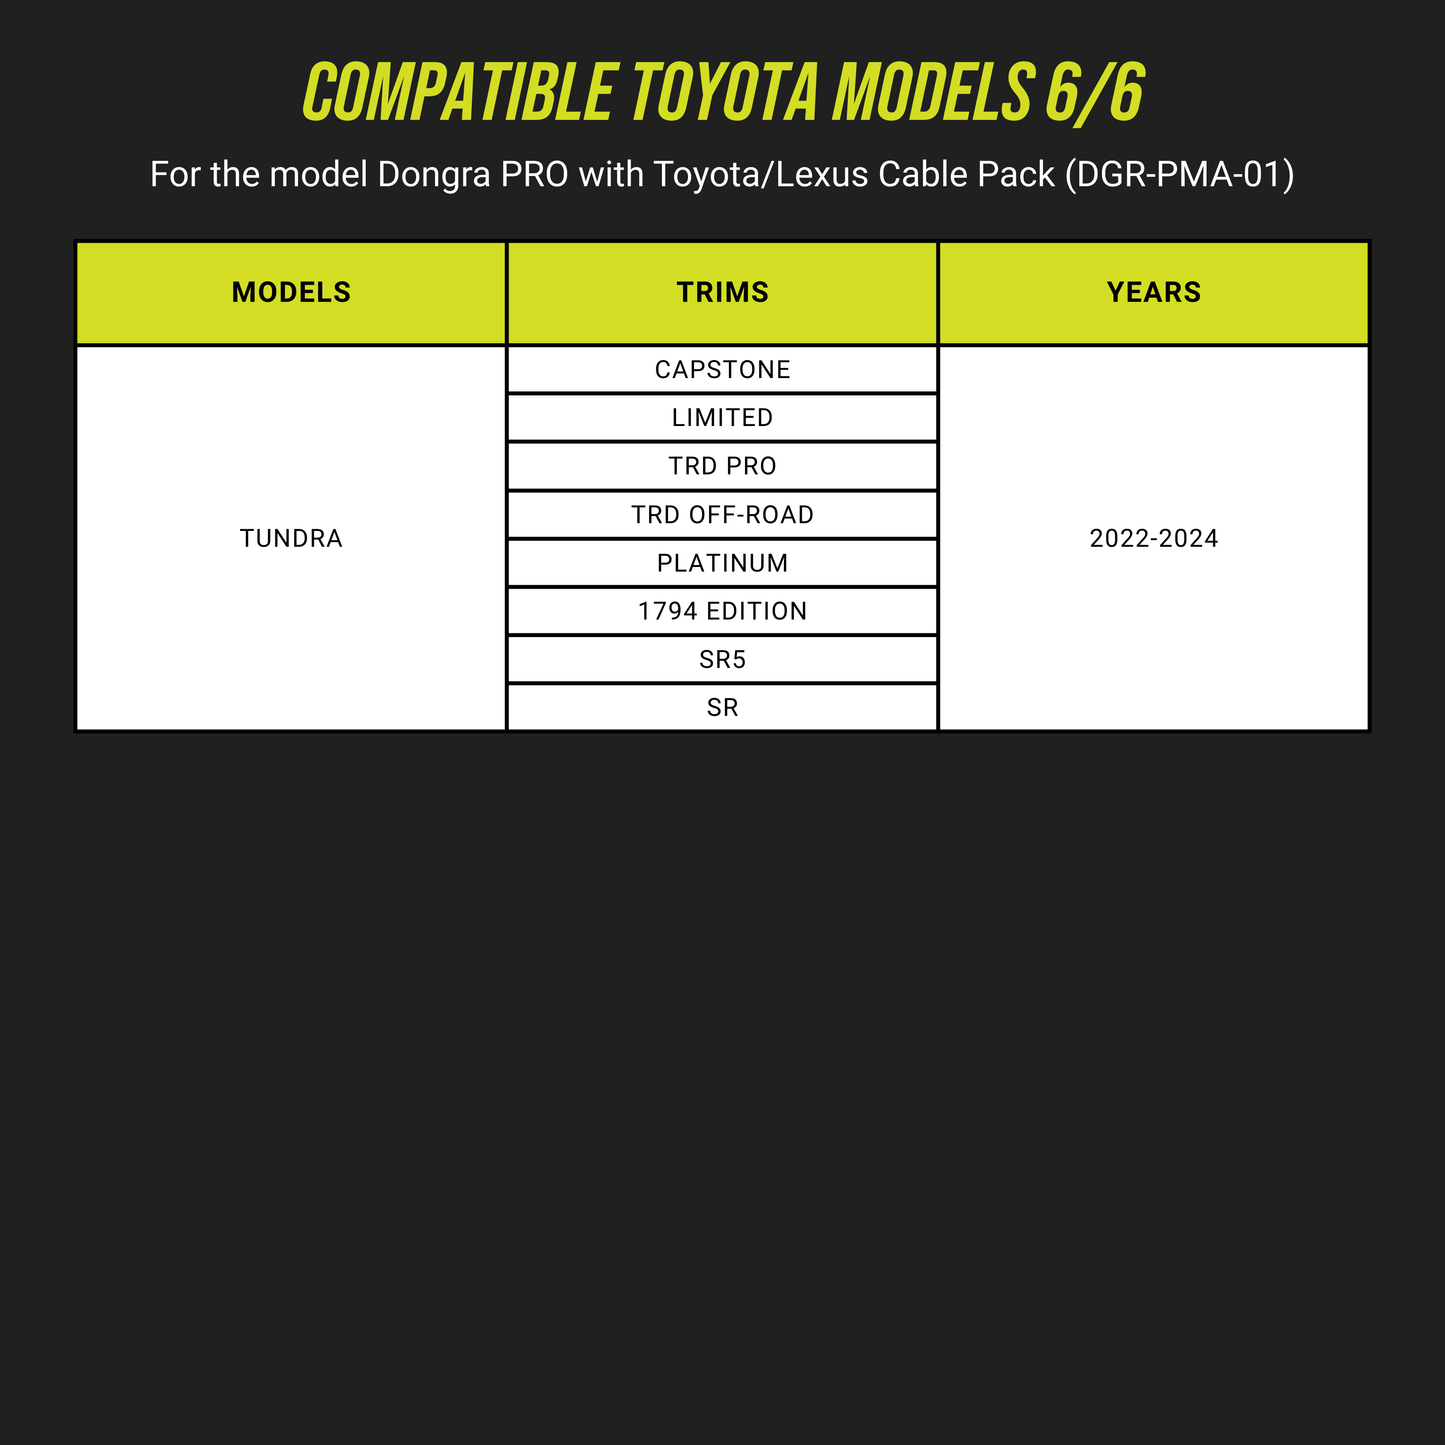
The Dongar PRO Hardwire Kit is compatible with all vehicle makes and models, making it the simplest choice for extended power options.
HOW TO INSTALL:
- Turn your vehicle OFF before beginning installation.
- Find your fuse box.
While fuse boxes are typically located in the footwell, this can change based on your vehicle’s manufacturer. We recommend consulting your vehicle’s user manual or fuse box diagram online to confirm the fuse box location. If you have more than one fuse box, we recommend using the fuse box closest to where you’ll be installing your dash cam.
- Locate your relevant fuses (you will need one constant-power fuse and one ignition-on fuse).
Just like the location of the fuse box, the functions of each fuse can change based on your vehicle’s manufacturer, so we recommend consulting your vehicle’s user manual or fuse box diagram online to confirm the proper fuses to use. It is also important to note that many fuses power essential car safety functions, such as airbags, horn, control programs, etc. – avoid using these fuses.
- Find and install the appropriate fuse taps (Item E) from your Dongar PRO kit.
Our kit comes with 2 each of the 4 most common kinds of fuse taps. To find the correct fuse taps for your vehicle, first remove your previously selected constant power fuse from your vehicle and choose the set of fuse taps that match it.
- Remove the chosen constant-power fuse from the fuse box. Reinsert that fuse into the lower position of the fuse-tap (E). If replacing the fuse, always use the exact same amperage rating as the one you’re replacing, specified by the vehicle manufacturer. The top fuse in the fuse-tap is pre-installed and protects the Dongar PRO. There should now be two fuses installed into the fuse-tap.
- Repeat the same steps with the chosen ignition-on fuse.
- Install the grounding wire (black wire) of the hardwiring cable (B) by slotting the metal prongs around any metal bolt grounded to the vehicle chassis (preferably near the fuse box). Ensure it is tightened to factory specification.
- Connect the Dongar PRO Module: Insert the small 3-pin end of your hardwiring cable (Item B) into the matching port on the Dongar PRO module (Item A). Connect the hardwiring cable (Item B) to the corresponding fuse taps, ensuring the clear plastic boots completely cover the metal connectors. Connect the constant power fuse tap to the red wire Connect the ignition-on power fuse tap to the yellow wire.
- Before reassembling your vehicle, ensure everything is working as intended: Turn your vehicle on and move the switch on your Dongar PRO to “IGN”. The light on your USB module should be solid red. With the vehicle still on, move the switch on your Dongar PRO to “T.” Turn off your vehicle. The lights on your USB module should be pulsing green. Turn your vehicle back on. Move the switch on your Dongar PRO to “∞.” Turn off your vehicle. The lights on your USB module should be pulsing red.
- Once you have confirmed the PRO is working as intended, disconnect your dash cam from the adapter. You can also disconnect the PRO to make routing the hardwire cable easier.
- Route the hardwire cable from the fuse box up the appropriate pillar (this will depend on the location of your fuse box – for example, if your fuse box is in the driver’s footwell you would route up your vehicle’s A-pillar), finishing somewhere near the top of your windshield.
Removing interior panels might be required. Depending on the vehicle, you might get away with simply pushing the wiring up into the various interior crevices and gaps. Be careful not to interfere with any airbags or safety computers that might be hidden, or routing the hardwire cable over any airbag as to obstruct its function.
- Reconnect the small 3-pin end of the hardwire cable to the Dongar PRO USB module.
- Mount the PRO USB module somewhere convenient. We recommend attaching the module to the windshield or near the rearview mirror using the pre-cut adhesive pad on the USB module. Finish the installation by using the appropriate provided shorty USB cable to plug your dash cam into the USB-C port on the PRO module.

Dongar
Dongar PRO Parking Mode Adapter
Share


- Wenn du dich für eine Auswahl entscheidest, wird die Seite komplett aktualisiert.
- Wird in einem neuen Fenster geöffnet.


