

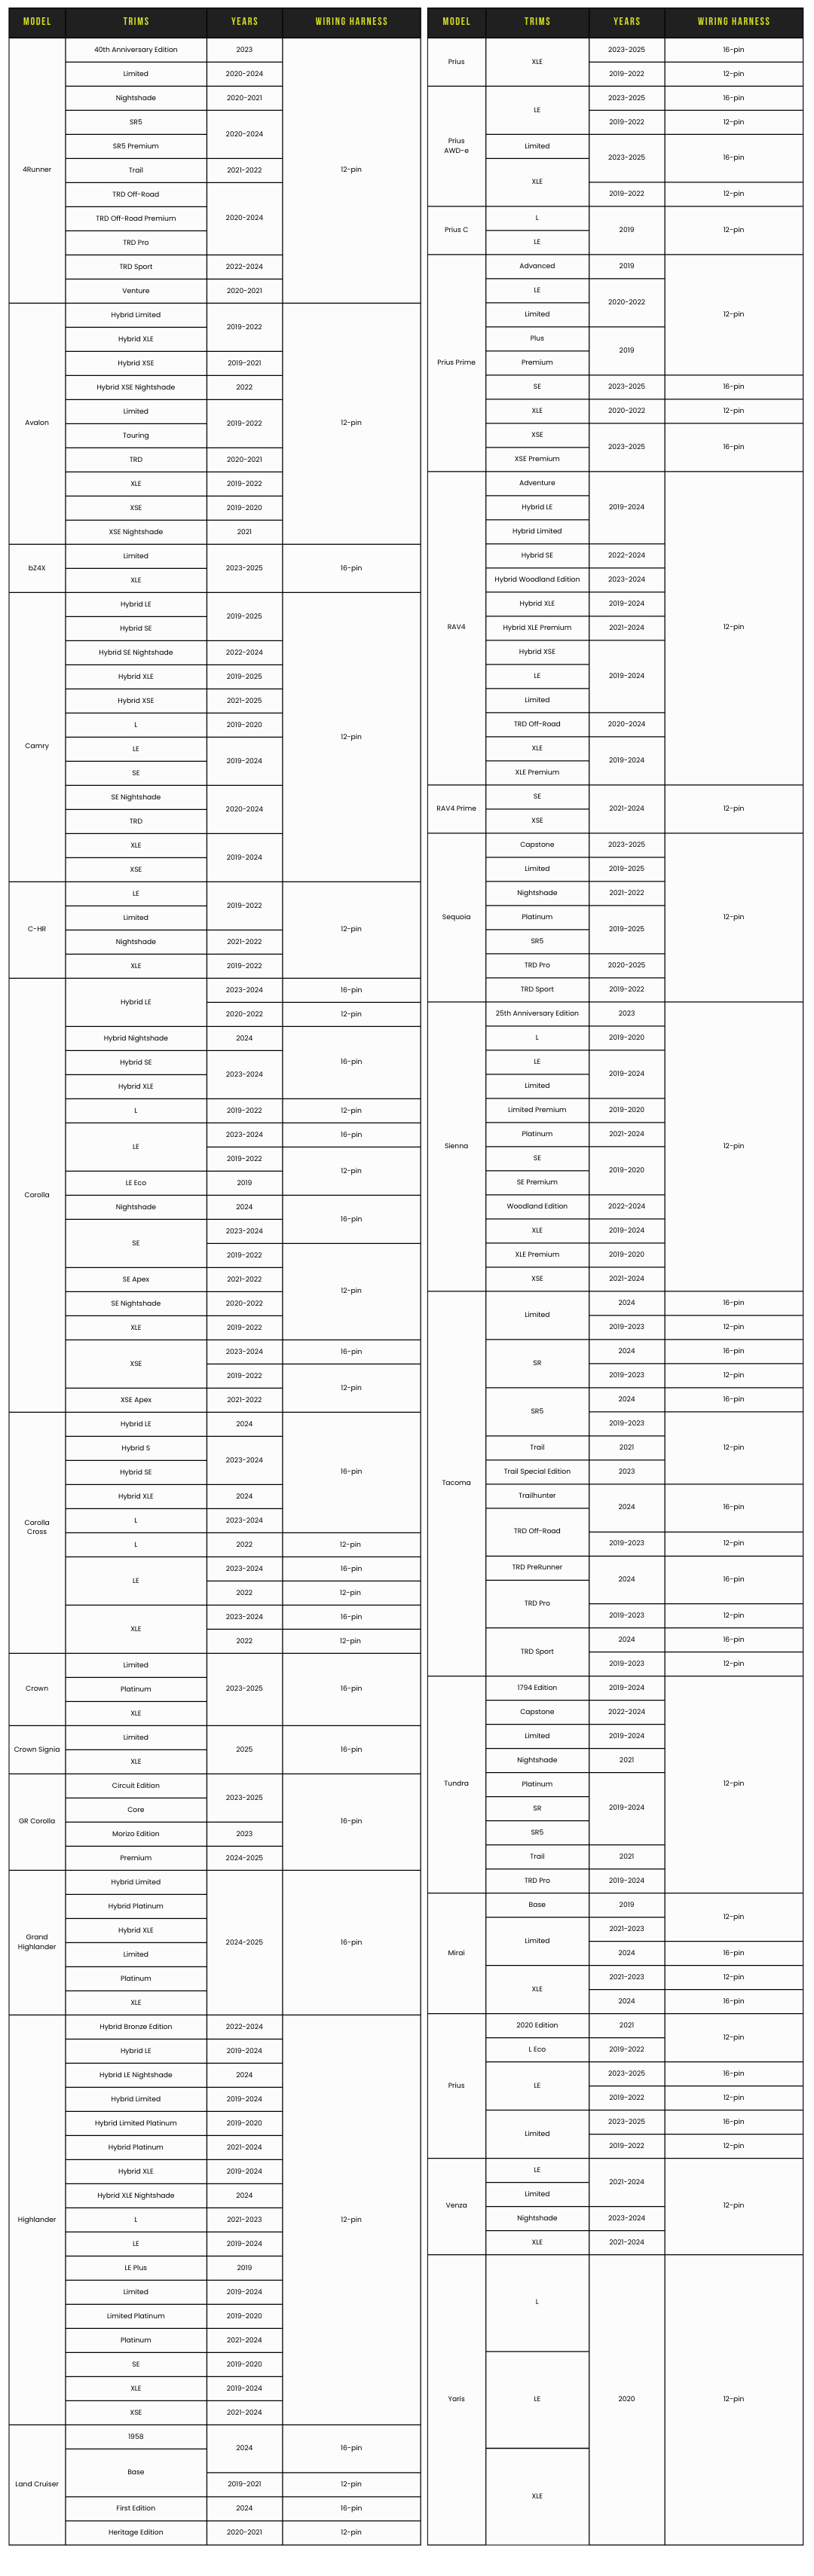
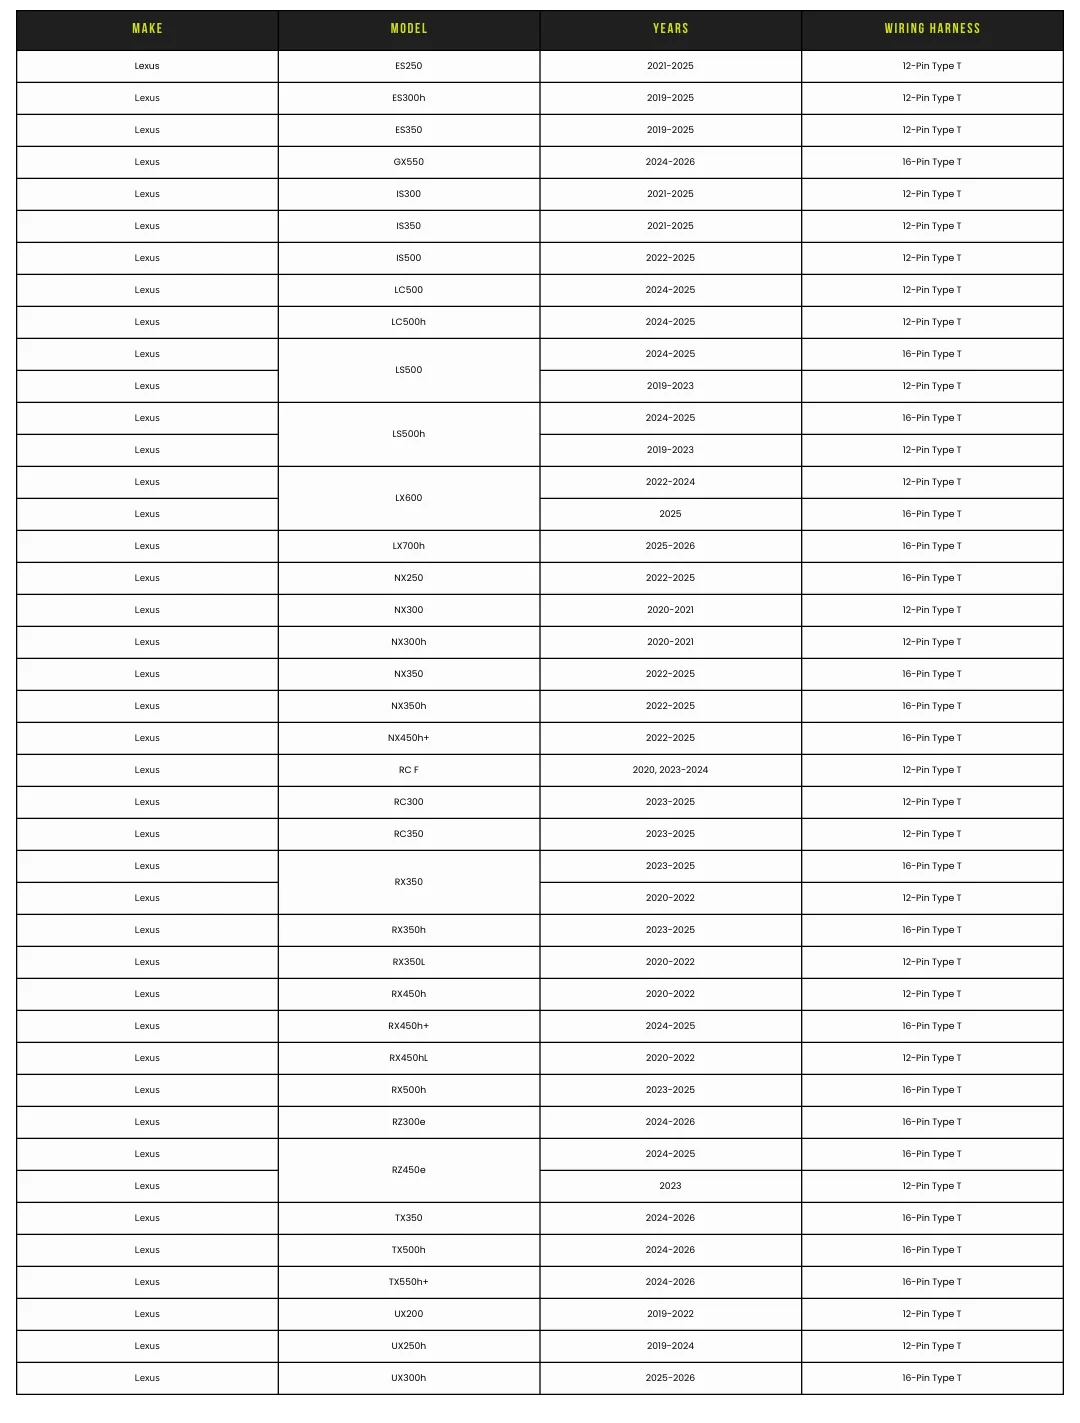
Lane Trace System Adapter Compatibility
Please confirm your vehicle's compatibility and appropriate wiring harness using the chart below:
| Make | Model | SubModel | Year | Wiring Harness |
| Toyota | 4Runner | 40th Anniversary Edition | 2023 | 12-pin |
| Limited | 2020-2024 | |||
| Nightshade | 2020-2021 | |||
| SR5 | 2020-2024 | |||
| SR5 Premium | ||||
| Trail | 2021-2022 | |||
| TRD Off-Road | 2020-2024 | |||
| TRD Off-Road Premium | ||||
| TRD Pro | ||||
| TRD Sport | 2022-2024 | |||
| Venture | 2020-2021 | |||
| Toyota | Avalon | Hybrid Limited | 2019-2022 | 12-pin |
| Hybrid XLE | ||||
| Hybrid XSE | 2019-2021 | |||
| Hybrid XSE Nightshade | 2022 | |||
| Limited | 2019-2022 | |||
| Touring | ||||
| TRD | 2020-2021 | |||
| XLE | 2019-2022 | |||
| XSE | 2019-2020 | |||
| XSE Nightshade | 2021 | |||
| Toyota | bZ4X | Limited | 2023-2025 | 16-pin |
| XLE | ||||
| Toyota | Camry | Hybrid LE | 2019-2025 | 12-pin |
| Hybrid SE | ||||
| Hybrid SE Nightshade | 2022-2024 | |||
| Hybrid XLE | 2019-2025 | |||
| Hybrid XSE | 2021-2025 | |||
| L | 2019-2020 | |||
| LE | 2019-2024 | |||
| SE | ||||
| SE Nightshade | 2020-2024 | |||
| TRD | ||||
| XLE | 2019-2024 | |||
| XSE | ||||
| Toyota | C-HR | LE | 2019-2022 | 12-pin |
| Limited | ||||
| Nightshade | 2021-2022 | |||
| XLE | 2019-2022 | |||
| Toyota | Corolla | Hybrid LE | 2023-2024 | 16-pin |
| 2020-2022 | 12-pin | |||
| Hybrid Nightshade | 2024 | 16-pin | ||
| Hybrid SE | 2023-2024 | |||
| Hybrid XLE | ||||
| L | 2019-2022 | 12-pin | ||
| LE | 2023-2024 | 16-pin | ||
| 2019-2022 | 12-pin | |||
| LE Eco | 2019 | |||
| Nightshade | 2024 | 16-pin | ||
| SE | 2023-2024 | |||
| 2019-2022 | 12-pin | |||
| SE Apex | 2021-2022 | |||
| SE Nightshade | 2020-2022 | |||
| XLE | 2019-2022 | |||
| XSE | 2023-2024 | 16-pin | ||
| 2019-2022 | 12-pin | |||
| XSE Apex | 2021-2022 | |||
| Toyota | Corolla Cross | Hybrid LE | 2024 | 16-pin |
| Hybrid S | 2023-2024 | |||
| Hybrid SE | ||||
| Hybrid XLE | 2024 | |||
| Hybrid XSE | 2023-2024 | |||
| L | ||||
| 2022 | 12-pin | |||
| LE | 2023-2024 | 16-pin | ||
| 2022 | 12-pin | |||
| XLE | 2023-2024 | 16-pin | ||
| 2022 | 12-pin | |||
| Toyota | Crown | Limited | 2023-2025 | 16-pin |
| Platinum | ||||
| XLE | ||||
| Toyota | Crown Signia | Limited | 2025 | 16-pin |
| XLE | ||||
| Toyota | GR Corolla | Circuit Edition | 2023-2025 | 16-pin |
| Core | ||||
| Morizo Edition | 2023 | |||
| Premium | 2024-2025 | |||
| Toyota | Grand Highlander | Hybrid Limited | 2024-2025 | 16-pin |
| Hybrid Platinum | ||||
| Hybrid XLE | ||||
| Limited | ||||
| Platinum | ||||
| XLE | ||||
| Toyota | Highlander | Hybrid Bronze Edition | 2022-2024 | 12-pin |
| Hybrid LE | 2019-2024 | |||
| Hybrid LE Nightshade | 2024 | |||
| Hybrid Limited | 2019-2024 | |||
| Hybrid Limited Platinum | 2019-2020 | |||
| Hybrid Platinum | 2021-2024 | |||
| Hybrid XLE | 2019-2024 | |||
| Hybrid XLE Nightshade | 2024 | |||
| L | 2021-2023 | |||
| LE | 2019-2024 | |||
| LE Plus | 2019 | |||
| Limited | 2019-2024 | |||
| Limited Platinum | 2019-2020 | |||
| Platinum | 2021-2024 | |||
| SE | 2019-2020 | |||
| XLE | 2019-2024 | |||
| XSE | 2021-2024 | |||
| Toyota | Land Cruiser | 1958 | 2024 | 16-pin |
| Base | ||||
| 2019-2021 | 12-pin | |||
| First Edition | 2024 | 16-pin | ||
| Heritage Edition | 2020-2021 | 12-pin | ||
| Toyota | Mirai | Base | 2019 | 12-pin |
| Limited | 2021-2023 | |||
| 2024 | 16-pin | |||
| XLE | 2021-2023 | 12-pin | ||
| 2024 | 16-pin | |||
| Toyota | Prius | 2020 Edition | 2021 | 12-pin |
| L Eco | 2019-2022 | |||
| LE | 2023-2025 | 16-pin | ||
| 2019-2022 | 12-pin | |||
| Limited | 2023-2025 | 16-pin | ||
| 2019-2022 | 12-pin | |||
| XLE | 2023-2025 | 16-pin | ||
| 2019-2022 | 12-pin | |||
| Toyota | Prius AWD-e | LE | 2023-2025 | 16-pin |
| 2019-2022 | 12-pin | |||
| Limited | 2023-2025 | 16-pin | ||
| XLE | ||||
| 2019-2022 | 12-pin | |||
| Toyota | Prius C | L | 2019 | 12-pin |
| LE | ||||
| Toyota | Prius Prime | Advanced | 2019 | 12-pin |
| LE | 2020-2022 | |||
| Limited | ||||
| Plus | 2019 | |||
| Premium | ||||
| SE | 2023-2025 | 16-pin | ||
| XLE | 2020-2022 | 12-pin | ||
| XSE | 2023-2025 | 16-pin | ||
| XSE Premium | ||||
| Toyota | RAV4 | Adventure | 2019-2024 | 12-pin |
| Hybrid LE | ||||
| Hybrid Limited | ||||
| Hybrid SE | 2022-2024 | |||
| Hybrid Woodland Edition | 2023-2024 | |||
| Hybrid XLE | 2019-2024 | |||
| Hybrid XLE Premium | 2021-2024 | |||
| Hybrid XSE | 2019-2024 | |||
| LE | ||||
| Limited | ||||
| TRD Off-Road | 2020-2024 | |||
| XLE | 2019-2024 | |||
| XLE Premium | ||||
| Toyota | RAV4 Prime | SE | 2021-2024 | 12-pin |
| XSE | ||||
| Toyota | Sequoia | Capstone | 2023-2025 | 12-pin |
| Limited | 2019-2025 | |||
| Nightshade | 2021-2022 | |||
| Platinum | 2019-2025 | |||
| SR5 | ||||
| TRD Pro | 2020-2025 | |||
| TRD Sport | 2019-2022 | |||
| Toyota | Sienna | 25th Anniversary Edition | 2023 | 12-pin |
| L | 2019-2020 | |||
| LE | 2019-2024 | |||
| Limited | ||||
| Limited Premium | 2019-2020 | |||
| Platinum | 2021-2024 | |||
| SE | 2019-2020 | |||
| SE Premium | ||||
| Woodland Edition | 2022-2024 | |||
| XLE | 2019-2024 | |||
| XLE Premium | 2019-2020 | |||
| XSE | 2021-2024 | |||
| Toyota | Tacoma | Limited | 2024 | 16-pin |
| 2019-2023 | 12-pin | |||
| SR | 2024 | 16-pin | ||
| 2019-2023 | 12-pin | |||
| SR5 | 2024 | 16-pin | ||
| 2019-2023 | 12-pin | |||
| Trail | 2021 | |||
| Trail Special Edition | 2023 | |||
| Trailhunter | 2024 | 16-pin | ||
| TRD Off-Road | ||||
| 2019-2023 | 12-pin | |||
| TRD PreRunner | 2024 | 16-pin | ||
| TRD Pro | ||||
| 2019-2023 | 12-pin | |||
| TRD Sport | 2024 | 16-pin | ||
| 2019-2023 | 12-pin | |||
| Toyota | Tundra | 1794 Edition | 2019-2024 | 12-pin |
| Capstone | 2022-2024 | |||
| Limited | 2019-2024 | |||
| Nightshade | 2021 | |||
| Platinum | 2019-2024 | |||
| SR | ||||
| SR5 | ||||
| Trail | 2021 | |||
| TRD Pro | 2019-2024 | |||
| Toyota | Venza | LE | 2021-2024 | 12-pin |
| Limited | ||||
| Nightshade | 2023-2024 | |||
| XLE | 2021-2024 | |||
| Toyota | Yaris | L | 2020 | 12-pin |
| LE | ||||
| XLE |
For more information or help figuring out which wiring harness is compatible with your vehicle, please contact Dongar Support here.

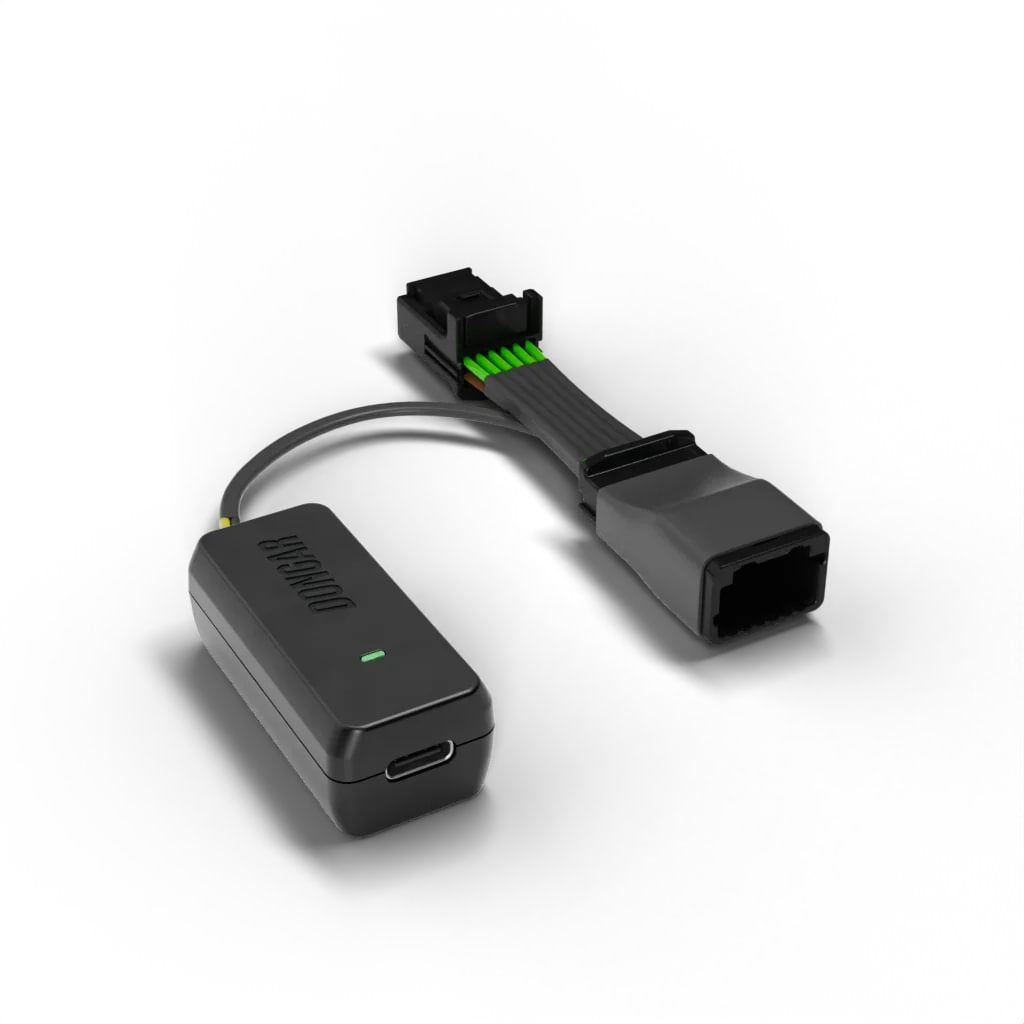
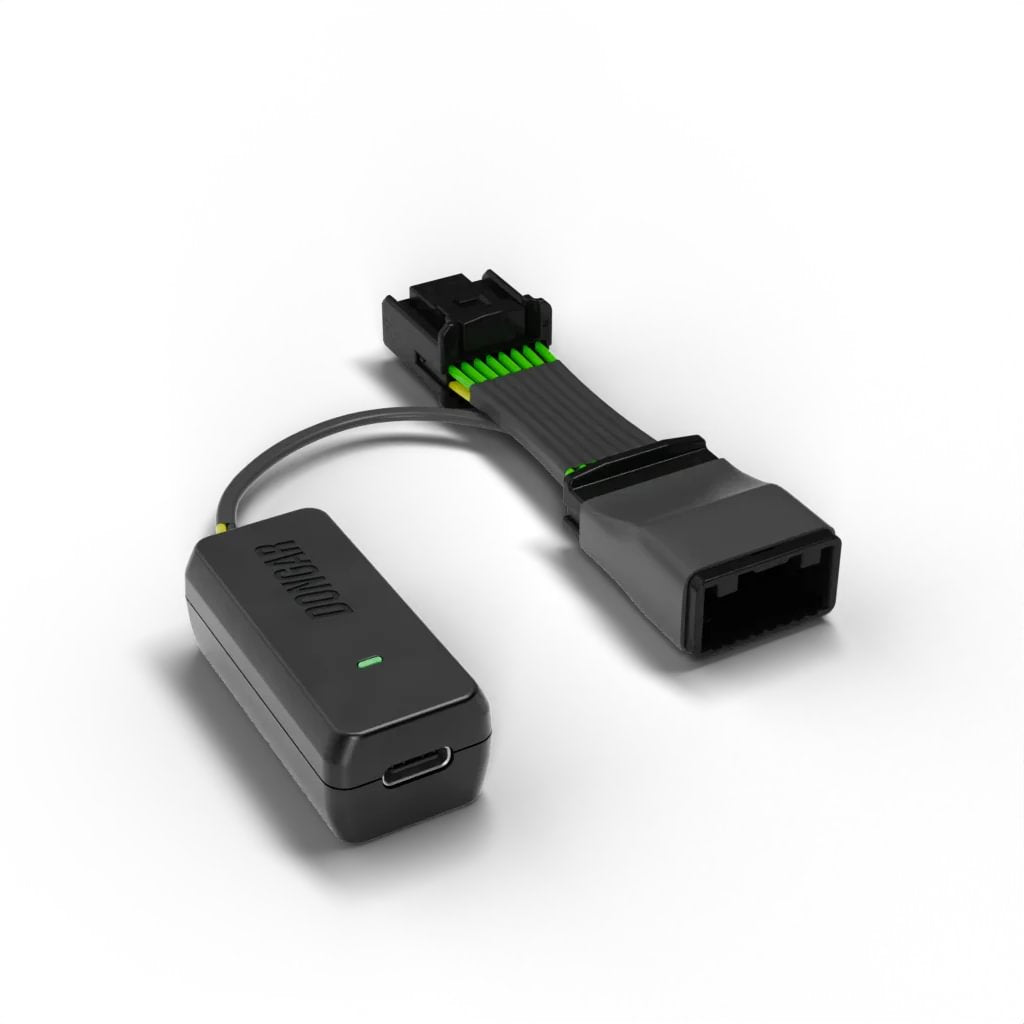
How it works
By sharing the power already flowing to your vehicle’s lane-trace assist system, the Dongar Classic allows you to power your dash cam while maintaining all important OEM safety functions.
You’ll achieve an invisible dash cam setup quicker and easier than ever before—no messy hanging wires or complicated fuse box installation.
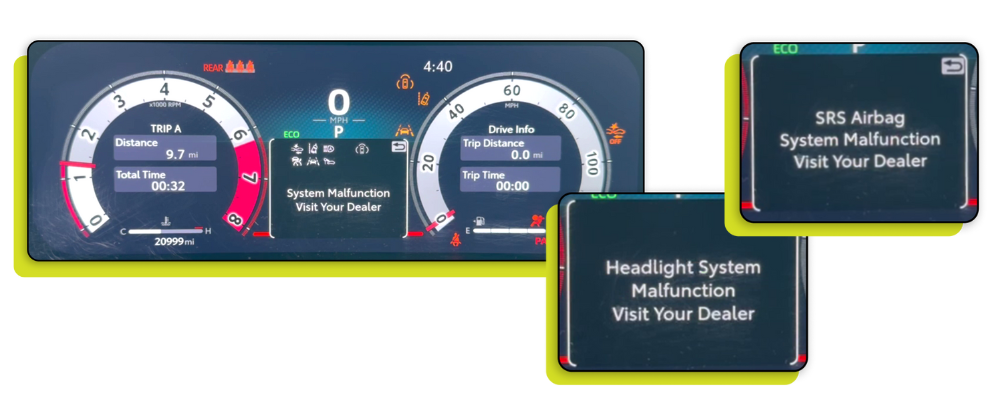
Safety Features:
Fuse Protection and Low Current Draw:
In case of a fault:
Fuse Protection and Low Current Draw:
Example Warnings:
Customers also bought:
-
128 GB microSD™-Karte der Klasse 10
Normaler Preis Von €14,95 EURNormaler PreisGrundpreis pro -
Mini Microfiber Lens Cleaning Cloth
Normaler Preis €0,95 EURNormaler PreisGrundpreis pro -
Digital Tire Pressure Gauge
Normaler Preis €8,95 EURNormaler PreisGrundpreis pro -
 Ausverkauft
128 GB microSD™-Karte der Klasse 10
Normaler Preis €2,95 EURNormaler PreisGrundpreis pro


- Wenn du dich für eine Auswahl entscheidest, wird die Seite komplett aktualisiert.
- Wird in einem neuen Fenster geöffnet.